Popping Comments With CSS Anchor Positioning And View-Driven Animations
December 9, 2024
[ad_1]
The State of CSS 2024 survey. packed and the results are interestingas always. While each section is worth analyzing, we tend to be most excited by the section on the most commonly used CSS features. And if you’re interested in writing about web development (maybe Start writing with us ), You should look specifically at the features Reading list Section. It contains the features that survey participants would like to read about after completing the survey and typically consists of emerging features with low community awareness.
One of the features I was excited about was my top picks for 2024: CSS anchor positioningPlacement in the top 4 of the survey. Directly below you will find Scroll controlled animationsanother amazing feature that gained wide browser support this year. Both are elegant and offer good things DXbut their combination opens up new possibilities that fall squarely into what most of us would have considered JavaScript territory just last year.
I would like to show one of these possibilities and at the same time learn more about both functions. Specifically, we will create the following blog post, in which footnotes will appear as comments on the sides of each text.
For this demo our requirements are:
Show the footnotes when they appear on the screen.
Attach them to the relevant texts.
The footnotes are on the sides of the screen, so we need a mobile fallback.
The Foundation
To start, we’ll use the following everyday example of blog post layout: title, cover image, and body text:
The only thing that stands out about the markup is that every now and then we have a paragraph with a footnote at the end:
    Super intereseting information!
     A footnote about it
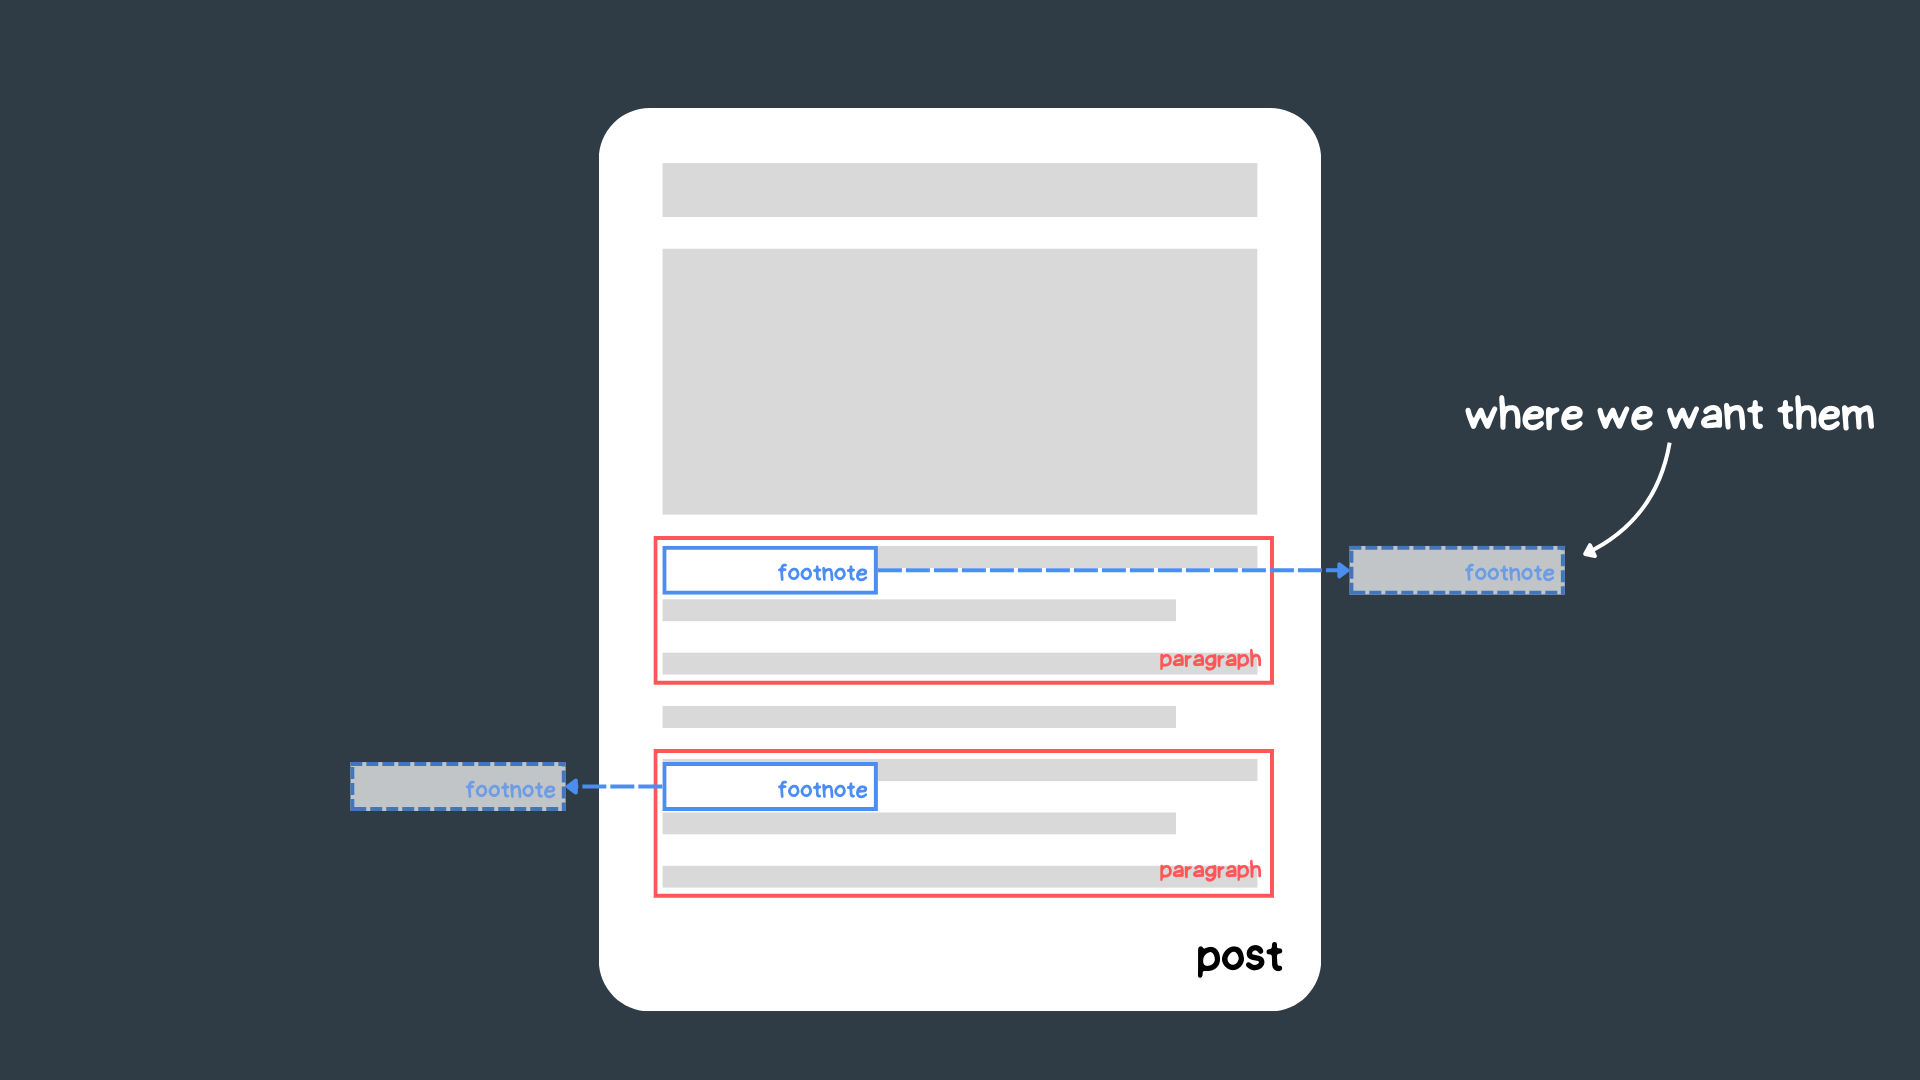
In this demo, the footnotes are in the body of the post, right after the text we want to note. However, we want them to be attached to the side of the text as floating bubbles. In the past we probably needed a mix of absolute and relative positioning, as well as finding the right insertion properties for each footnote.
However, we can now use anchor positioning for this job, a feature that allows us to position absolute elements relative to other elements – and not just relative to the containment context in which they are located. We will talk about “anchors” and “goals”. for a while, so a little terminology to get you started:
Anchor: This is the element used as a reference for positioning other elements, hence the name of the anchor.
Goal: This is an absolutely positioned element that is placed relative to one or more anchors. Target is the name we will use from now on, but you will often find it just as an “absolutely positioned element” in other resources.
I won’t go into every detail, but if you want to learn more, I highly recommend ours Anchor positioning instructions Detailed information and examples can be found here.
The anchor and the goal
It’s easy to know that .footnote is a target element. However, choosing our anchor requires more nuance. Even though it seems like every .note element should be an anchor element, it’s better to choose the whole thing .post as an anchor. Let me explain if we set that .footnote Position on the Absolute:
.footnote {
  position: absolute;
}
You will notice that the .footnote Elements in the post are removed from the normal document flow and visually float above them .note elements. This is great news! Since they are already aligned on the vertical axis, all we need to do is move them to their sides on the horizontal axis, using the post as an anchor.
In this case we would need to find the correct insertion property to place it on the sides. Although this is doable, it is a painful decision because:
You would have to rely on a magic number.
This depends on the viewport.
This depends on the content of the footnote as this changes the width.
By default, elements are not anchors. To register the post as an anchor we need to use this anchor-name property and give it a dashed-ident (a custom name that starts with two hyphens) as its name.
.post {
  anchor-name: --post;
}
In this case our target element would be this .footnote. To use a target element, we can maintain absolute positioning and select an anchor element using position-anchor Property that takes on the dashed identity of the anchor. That will do .post In the following step, set the default anchor for the target.
Instead of choosing an arbitrary insert value for .footnote‘S left or right We can use properties anchor() Function. It returns a Value containing the position of one side of the anchor, so we can always set the insertion properties of the target correctly. So we can connect the left side of the target to the right side of the anchor and vice versa:
.footnote {
  position: absolute;
  position-anchor: --post;

  /* To place them on the right */
  left: anchor(right);

  /* or to place them on the left*/
  right: anchor(left);

  /* Just one of them at a time! */
}
However, you will notice that it sticks to the side of the post and has no space in between. Luckily that is margin The property works exactly as you hoped with target elements, leaving a small gap between the footnote target and the post anchor. We can also add a few more styles to make things nicer:
Finally, all of ours .footnote Elements are on the same side of the post. If we want to arrange them individually on each page, we can use the nth-of-type() Select the selector even And odd Notes and place them on opposite pages.
We use nth-of-type() instead of nth-child since we just want to iterate .note elements and not all siblings.
Remember to remove the last inserted declaration from .footnoteAnd Tada! We have our footnotes on every page. You’ll notice that I’ve also added a small triangle to each footnote, but that’s beyond the scope of this post:
The view-driven animation
Let’s start by creating the popup animation. I find it the easiest part as both the view and the scroll-controlled animation are designed to be as intuitive as possible. We’ll start by registering an animation using an everyday @keyframes. We want our footnotes to become invisible and slowly grow larger and visible:
@keyframes pop-up {
  from {
    opacity: 0;
    transform: scale(0.5);
  }

  to {
    opacity: 1;
  }
}
This is our animation, now we just need to add them to each one .footnote:
.footnote {
  /* ... */
  animation: pop-up linear;
}
That alone doesn’t help. Normally we would have set one animation-duration to get it started. However, view-driven animations do not progress over a fixed time, but rather the animation progress depends on where the element is on the screen. We define this for this purpose animation-timeline To view().
This will stop the animation as soon as the element leaves the screen. We want it to end in a more readable place. The final touch is setting animation-range To cover 0% cover 40%. This means: “I want the element to start animating when it is 0% in the view and end when it is 40% in the view.”
You may have noticed that this approach to footnotes doesn’t work on smaller screens because there is no space on the sides of the post. The solution is simple. We want the footnotes to appear as regular notes on small screens and as comments on larger screens. We can achieve this by only making our comments available when the screen is larger than a certain threshold 1000px. If not, the notes will appear in the body of the post like any other note you might find on the internet.
Now our comments should only appear on the sides if there is enough space for them:
Summary
If you also enjoy writing about something you care about, you often find yourself running into random cross-cuts or wanting to add a comment in each paragraph to provide additional context. At least that’s the case for me, so the ability to display comments dynamically is a great addition. Especially when we managed to use only CSS – in a way we couldn’t have done just a year ago!

[ad_1]
The State of CSS 2024 survey. packed and the results are interestingas always. While each section is worth analyzing, we tend to be most excited by the section on the most commonly used CSS features. And if you’re interested in writing about web development (maybe Start writing with us ), You should look specifically at the features Reading list Section. It contains the features that survey participants would like to read about after completing the survey and typically consists of emerging features with low community awareness.
One of the features I was excited about was my top picks for 2024: CSS anchor positioningPlacement in the top 4 of the survey. Directly below you will find Scroll controlled animationsanother amazing feature that gained wide browser support this year. Both are elegant and offer good things DXbut their combination opens up new possibilities that fall squarely into what most of us would have considered JavaScript territory just last year.
I would like to show one of these possibilities and at the same time learn more about both functions. Specifically, we will create the following blog post, in which footnotes will appear as comments on the sides of each text.
For this demo our requirements are:
The Foundation
To start, we’ll use the following everyday example of blog post layout: title, cover image, and body text:
The only thing that stands out about the markup is that every now and then we have a paragraph with a footnote at the end:
In this demo, the footnotes are in the body of the post, right after the text we want to note. However, we want them to be attached to the side of the text as floating bubbles. In the past we probably needed a mix of absolute and relative positioning, as well as finding the right insertion properties for each footnote.
However, we can now use anchor positioning for this job, a feature that allows us to position absolute elements relative to other elements – and not just relative to the containment context in which they are located. We will talk about “anchors” and “goals”. for a while, so a little terminology to get you started:
I won’t go into every detail, but if you want to learn more, I highly recommend ours Anchor positioning instructions Detailed information and examples can be found here.
The anchor and the goal
It’s easy to know that
.footnoteis a target element. However, choosing our anchor requires more nuance. Even though it seems like every .note element should be an anchor element, it’s better to choose the whole thing.postas an anchor. Let me explain if we set that.footnotePosition on the Absolute:You will notice that the
.footnoteElements in the post are removed from the normal document flow and visually float above them.noteelements. This is great news! Since they are already aligned on the vertical axis, all we need to do is move them to their sides on the horizontal axis, using the post as an anchor.In this case we would need to find the correct insertion property to place it on the sides. Although this is doable, it is a painful decision because:
By default, elements are not anchors. To register the post as an anchor we need to use this
anchor-nameproperty and give it a dashed-ident (a custom name that starts with two hyphens) as its name.In this case our target element would be this
.footnote. To use a target element, we can maintain absolute positioning and select an anchor element usingposition-anchorProperty that takes on the dashed identity of the anchor. That will do.postIn the following step, set the default anchor for the target.Move the target
Instead of choosing an arbitrary insert value for
.footnote‘SleftorrightWe can use propertiesanchor()Function. It returns aHowever, you will notice that it sticks to the side of the post and has no space in between. Luckily that is
marginThe property works exactly as you hoped with target elements, leaving a small gap between the footnote target and the post anchor. We can also add a few more styles to make things nicer:Finally, all of ours
.footnoteElements are on the same side of the post. If we want to arrange them individually on each page, we can use thenth-of-type()Select the selectorevenAndoddNotes and place them on opposite pages.We use
nth-of-type()instead ofnth-childsince we just want to iterate.noteelements and not all siblings.Remember to remove the last inserted declaration from
.footnoteAnd Tada! We have our footnotes on every page. You’ll notice that I’ve also added a small triangle to each footnote, but that’s beyond the scope of this post:The view-driven animation
Let’s start by creating the popup animation. I find it the easiest part as both the view and the scroll-controlled animation are designed to be as intuitive as possible. We’ll start by registering an animation using an everyday
@keyframes. We want our footnotes to become invisible and slowly grow larger and visible:This is our animation, now we just need to add them to each one
.footnote:That alone doesn’t help. Normally we would have set one
animation-durationto get it started. However, view-driven animations do not progress over a fixed time, but rather the animation progress depends on where the element is on the screen. We define this for this purposeanimation-timelineToview().This will stop the animation as soon as the element leaves the screen. We want it to end in a more readable place. The final touch is setting
animation-rangeTocover 0% cover 40%. This means: “I want the element to start animating when it is 0% in the view and end when it is 40% in the view.”This amazing tool from Bramus that focuses on scroll and view driven animations better shows how The
animation-rangeProperty works.What about mobile devices?
You may have noticed that this approach to footnotes doesn’t work on smaller screens because there is no space on the sides of the post. The solution is simple. We want the footnotes to appear as regular notes on small screens and as comments on larger screens. We can achieve this by only making our comments available when the screen is larger than a certain threshold
1000px. If not, the notes will appear in the body of the post like any other note you might find on the internet.Now our comments should only appear on the sides if there is enough space for them:
Summary
If you also enjoy writing about something you care about, you often find yourself running into random cross-cuts or wanting to add a comment in each paragraph to provide additional context. At least that’s the case for me, so the ability to display comments dynamically is a great addition. Especially when we managed to use only CSS – in a way we couldn’t have done just a year ago!
[ad_2]
Source link